You’ve started growing microgreens or you’ve begun looking into it. You want perfect, plump sprouts and greens. Grocery stores and restaurants are more likely to buy if everything’s uniform.
I wanted to know this as well as I’ve been having issues getting my microgreens uniform. I heard weight was the answer. But which microgreens need weight and which can you grow without it? Do they need a blackout period?
The microgreens that need weight are kale, sunflowers, and radish microgreens. Weight leads to faster and more thorough germination which means you can get your microgreens to market faster. This happens because covers and weights prevent the soil and seeds from drying out when germinating, builds thicker stronger first stems, and helps seeds shed their hulls.
Note: If you click some of the links in this article we may earn a small commission at no additional cost to you.
Why You Need Weight When Starting Trays
The weight keeps seeds moist and helps with even, fast germination. This means each tray gets to market (or your kitchen table) faster.
More specifically, adding weights does the following:
- More seeds will successfully germinate (fewer duds)
- Faster germination – This means you’ll get to the final product faster.
- Prevents the seeds from drying out
- Traps humidity in the soil
- Keeps good contact of the seeds and the soil
- Loosens the hulls so your plants can shed them easier and you can rinse them off faster (cleaner end product)
- Roots dig deeper into the soil
Which Microgreens Need Weight
The following microgreens do best with 3-7 lbs of added weight.
- Kale
- Sunflower
- Radish
This is an area that needs more research as not all varieties have been tested. Whenever starting a new seed or variety always do this simple experiment:
- Tray Cover Only
- Tray With Cover and 3 lb weight
Grow these to completion over 10 days then harvest and weigh the results.
How Much Weight Do You Put On Microgreens
The amount of weight will vary depending on the type of seed. Based on previous experiments here are a few rules of thumb to follow: Broccoli doesn’t need any weight. It just needs a cover to keep in the humidity. Radishes do best with 3 lb weights per tray. Kale also doesn’t require much weight. 3 lbs are sufficient.
See the video below for more.
When To Put Weight on Microgreens
Use weight during initial germination.
Fill your tray with 1 inch of substrate. Add 10 grams of seeds. Then water till moist and let drain.
Add another tray as a cover than a 3 lb weight.
How Long To Use Weight
Leave the weight on for the first 3-4 days. Once all the seeds are germinated it’s time to move on to the blackout period.
Materials Needed
Using weights for microgreens is easy. All you need is a small 3 lb sandbag or similar weight and an empty growing tray.
 - 20\" x 10\" - Perfect Garden Seed Starter Grow Trays: for Seedlings, Indoor Gardening, Growing Microgreens, Wheatgrass & More - Soil or Hydroponic")
")
Results Of Weight Experiments On Different Microgreens
Kale Microgreen Weight Results
In the video below On The Grow did an experiment with weight on kale microgreens.
They ran the experiment with four trays. Each tray used 10 grams of kale seeds and about 1 inch of coco coir media as the growing substrate. All were watered the same amount.
The only variations were the type of cover and the amount of weight.
Experiment Setup
- Control – The first tray was a control group. It had 1 inch of coco coir topped with 10 grams of kale seeds. No weight or cover was used.
- Paper Towel Only – The second tray used 1 inch of coco coir topped with kale seeds then covered by a wet paper towel.
- Tray Only – The third tray has 1 inch of coco coir topped with seeds. Then it was covered by another 1-ounce tray that added a very small amount of weight, partially blocked the light, and helped keep in humidity.
- Tray with 7 lb weight – The fourth tray used 1 inch of coco coir topped with kale seeds. It was covered by a tray and a 7 lb weight.
Experiment Results After 4 Days
- Control – Virtually no germination
- Paper Towel Only – Good germination but young sprouts
- Tray Only – Full germination with strong sprouts
- Tray with 7 lb weight – Full germination with strong sprouts and roots deep in coco coir
Broccoli Microgreen Weight Results
On The Grow did a second experiment with broccoli microgreens using the following setup:
- Tray cover only
- Tray with 3 lb sandbag
- Tray with 15 lb weight
In the video below you can see that visually the results were pretty much the same.
They harvested and weighed all the final microgreens.
In the end, they all weigh about the same as well. The 15 lb group was a little longer. Strangely the 7 lb group had less weight than the no weight group.
Final verdict – Weight doesn’t seem to help broccoli.
The Radish Experiment
On the Grow did a third experiment with radish microgreens. It was the same setup as the broccoli experiment. This time though the 3 lb weight had a higher yield than no weight or 15 lbs of weight.
This is just further proof that you need to test different weights for your variety and your chosen microgreen substrate.
Final verdict – Weight does help radishes. 3 lbs per tray are best.
What Is The Microgreen Blackout Period?
The blackout period is when you place a cover over the seeds when you are first starting them. This mimics burying the seeds in the soil and helps triggers your seeds to sprout.
You wouldn’t use real soil to cover them as that would just give you a dirty end product. It could also cause root rot or other diseases.
Purpose of the Blackout Period
The purpose of the blackout period is to get your seed sprouts to stretch. Without access to light, they’ll stretch tall trying to find it. This makes it much easier to cut and harvest them later.
Many microgreens don’t naturally like to grow tall in the first 7-10 days before harvest. The blackout period forces them to do this.
Luckily a non-transparent drain tray does this job perfectly. Simply flip it over and place it over your microgreens.
Some space is needed so if the tray is too shallow you’ll want to use something larger.

Blackout Vs. Weight – What’s More Important?
Both! The blackout period adds the darkness that simulates seeds being stamped into the soil.
The weight keeps in humidity and inspires the roots too deep for moisture and nutrients.
Not all microgreens need weight. Many work great just with the tray to induce a blackout and keep in the humidity.
Blackout Materials
The easiest material to use is just another tray like the one you’re growing in.
First prep a tray with growing media and seeds. Water till moist and let drain.
Then simply place an empty tray on top of the prepped tray. Remember that sprouts need space to stretch so be sure to use a tray that’s deep enough to give them growing room.
You can also use towels, cutting boards, plastic sheeting, cardboard, or anything else that’s safe to eat off of and that blocks all the light. However, many of these items don’t offer enough space. In combination with a clear cover, they can work great.
How Long To Blackout
Check your seed germination times for your specific setup. Keep them under blackout for 1-2 days longer than germination. This helps set the roots deeper and build stronger stems.
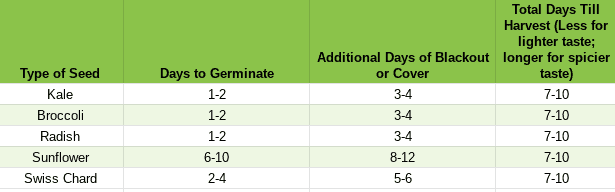
Here’s a quick table for common microgreens.
| Type of Seed | Days to Germinate | Additional Days of Blackout or Cover | Total Days Till Harvest (Less for lighter taste; longer for spicier taste) |
| Kale | 1-2 | 3-4 | 7-10 |
| Broccoli | 1-2 | 3-4 | 7-10 |
| Radish | 1-2 | 3-4 | 7-10 |
| Sunflower | 6-10 | 8-12 | 7-10 |
| Swiss Chard | 2-4 | 5-6 | 7-10 |